
Fig.1.

Fig.2.

Fig.3.

Fig.5.

Fig.6.

Fig.7.

Fig.8.
THE CARBURETTOR HITACHI 21L304-06 (NIKKI 21L).
The Illustrated story.
Some information about the carburetor, which I have found out.
The abbreviations:
Why it was necessary to get in the carburetor? I decided to do it. It seemed to me, that the machine began to go hardly worse. Idle, like, the boost, like, flasqued goes for a walk. Well, I think, it is time to clean a fuel system. I has purchased a dope for the fuel, then another one. There is no effect. Then has purchased a certain dope. I didn't remember the title of it. I can only say that the bottle color was black and there was an American flag on it. Purchased in KEMP (it is a known store of spares). After its application the fuel filter has clogged through 100 kilometers. I usually use filters BIG (they are a low-budget, but high quality russian filters). So I was not very upset and has replaced the filter. The same story with the filter was repeated again after 50-100ęě. The filter has replaced. And again has replaced. The filter did not clog any more, but the machine began to go poorly. It was necessary to get in the carb.
At first I have decided to remove only cover, not removing the carburetor. I has damaged the gasket a little not knowing it's organization. One more (and most important) my error became that I have not disconnected a rod of the accelerating pump (AP). I removed and put it back together with a carb cover. The carb was opened. I have found in the float chamber something strange. It was similar to cabbage-weeds. The replacing of filters could not help because of the depositions were in the carb where they have reacted with a dope. At assembly of carb with the not detached rod of AP it is impossible to insert a sealing ring into the AP well without damaging. The body position is inconvenient and in addition the sealing rings are absolutely not visible. Some time I went even better in contrast to last 200-300ęě. However after this time a motor of the machine became suddenly neither from that nor from this to stay in general on a full course and sometimes has ceased to be got.
At once in the morning in barn the motor in general has refused to be got. Having turned out of spark plug I has found certain black burnt lumps in its interelectrode space. Firstly I thought about the petrol quality. I opened the carb cover and found out the pure float chamber and absence of half of sealing ring of AP. It collapsed and it pieces got in all possible channels of the carb and even in the engine cylinders. By this way I came to conclusion about the necessity of removal and full disassembly of the carb.
I began to find the gasket kit in the shops. I don't say for all Moscow certainly, but 3/4 I has searched. According to the catalog there are 2 kinds of the kit - large ($ 170) and small ($ 110). But nobody knows the differences between them. In common it is the-cat-in-a-bag and very expencive. I have gone then in Nissanco (who does not know - it is a store of parts for Nissan cars) and has purchased there for $ 150 second-hand carb. In the selection of s-h carb the main factor for me was that the carb had not be disassembled by anybody up to me. It is possible to define looking at the screws condition. The upper cover is attached to a carb body by those screws. They are delayed heavy so it is impossible to open a cover and to keep the splines without any defect.
The carb outside was in an awful condition. My own one is much more cleanly. I opened the second carb and found that that's all right. Everything is properly functioning. Having washed and having cleaned, I now have the second carb perfectly working. There is only no sealing ring and one globule of AP in that carb.
To remove (with advantage) the
carburetor, it will be necessary:
1) Head on 12 with the extension, cardan and toll jack;
2) Tubular key on 10;
3) Cross and powerful splined screwdriver;
4) Pair of aerosol cans of a purifier of the carburetor on the basis of acetones;
5) Bottle of silicone lubrication;
6) Gasoline/oil/water-resistant sealant;
7) Large sheet of a cardboard as minimum (1ő1)ě (for example, the box from the
TV set), on which one is recommended to disassemble the carburetor in order
to prevent losses of components.
Removal:
There is a gasket with a built-in electrical preheater of a mixture between of carb and intake manifold. It is made from a solid plastic, on which one from both parties the gaskets are pasted.
The gaskets material is similar to very solid cardboard which one is imbued by something. The carburetor is preheated by cooling liquid, which one contacts to a bottom face of the carburetor through an oblong hole in the gasket. Around of a hole the gasket, apparently, in due course is a little saturated with cooling liquid and adheres to the carburetor. To not damage the gasket, I think, it is necessary to turn the carburetor in place in a horizontal plane, and then to raise from an intake manifold. I at once have pulled, carb hill up and part of the gasket between a channel and inlet well has appeared on carb. However I did not begin to clean off it from carb, and at the installation has lubricated an injured place to a small amount of a gasoline/oil/water resistant sealant and has put a carb on a place. Till now that's all right.
We disassemble and maintained.
The guidelines:
So:
I had not to separate the middle part from the bottom of the carburetor. Further disassembly not contained in itself of any unexpectedness. It is necessary to pay attention to a part, which one in any way are not fixed and can be lost at tumbling of the middle part. It is two plastic tubules on air metering jets 11 and 12 (see device), spring, small cylindrical small weight and globule under it, figured under digit 19 and in any way not marked, and spring of the accelerating pump under a rod. Well still it is necessary to not damage cardboard gaskets under centralizers of a mixture (10).
For wash of the channel of the accelerating pump it is necessary to take out a lock washer, grid and blob from the well of a rod of the accelerating pump.
For wash of the idle channel it is necessary at first to wrap up the screw of mixture ratio up to the end, totalling turnovers.
To turn off a main fuel jet near bottom of the float chamber established bevel way, it is not necessary. It was possible to flush its hole broad enough, that it and so. Furthermore to remove it, it is possible only having disassembled an observation window of the float chamber, which one thus can lose air-tightness.
Having got and having turned off all parts (air and fuel jets, centralizers of a mixture etc.) all channels in a body and cover is purged from bottles with a purifier. We flush chokes and axes, specially there, where they permeate a body.
For me, for example, at, in common pure on the first view, carburetor, with difficulty the cores of valves, tangle all courses leaving under chokes (idle) moved the channel in a valve needle idle has clogged, there was in any soot an idle air jet (14), tangle any white dirt small holes of venturi of 1-st chamber (6), with difficulty the throttle spindle of 2 chamber was spun, salt and has increased to spring a screw of idle control. Thus I consider the engine absolutely properly functioning, since oils not eat gramme, gases from under a cover plate absolutely not greasy and filter on their paths only in dry dust, suppository of exact color. One time, the truth, abnormally worked a recirculation system of exhaust gases.
Assembly not contained in itself of large difficulties. Only it is necessary, having inserted a globule, grid, lock washer and AP spring, at once to insert and rod, trying to not damage the diaphragm. A carb cover to put on a place at an already established AP rod.
Why I recommend silicone lubrication, instead of on WD40? The silicone lubrication makes surfaces slippery, not making thus by their greasy. To them the dust does not adhere.
Having carb collected, it is necessary to moisten all thread joints and moving parts by lubrication, to test freedom of a course. To not forget to return a screw of quality in a former position.
Before the installation of carb on
an intake manifold it is possible by the pin, wetted in a sealant, to anoint
the gasket with the heater.
Having put carb on a manifold and having mated holes, from below automobiles
by an arm we push fastening screws and turn them.
I can with confidence say, that all this procedure has helped to me and carb
now works as hours. Boost, as on the injector. That and you I wish.
Some apparent thoughts concerning faults:
|
Fig.1. |
Fig.2. |
Fig.3. |
|
Fig.5. |
Fig.6. |
Fig.7. |
|
|
Fig.8. |
P.S.from 29.10.2001. Everything,
that is written above, 1999-m by year (already is dated somewhere and I do not
remember precisely). Since then has learned(found out) a lot of new and has
run in weight of delicacies. To describe all this, a lot of time is necessary
and the whole book will receive. Can be sometime somehow somewhere I shall be
going, but it will be not speed.
I can only add, that:
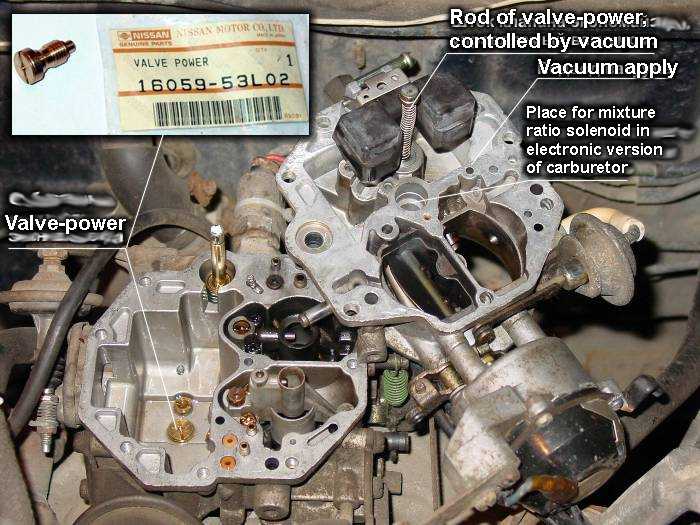
In the let out books about carburetors Nissan me phrases, type always amused: " We shall consider the device of the carburetor on an example of mechanical version.... Bla-bla-bla.... The device of the electronic carburetor similarly considered. " So it so, but on a following picture the difference is shown " in living ":
The main faults: